Auto SEO Script for Blogspot Blogs

Auto SEO Script for Blogspot Blogs

 
Blogger Or Blogspot, could be a free blogging service in hand by Google has created several rumors that it's not well optimized for search engines. There area unit several blogspot tutorial blogsites on web teaching thanks to get high rank on search engines. however it's going to be frustrating for several folks that at blogspot no choice or no any Script out there that area unit able to push up blogs at high on search engines ranking.
  I had tried quite twenty Scripts (Auto Title Swap, motorcar Meta Description, motorcar Meta Keywords, Meta automaton etc) for over four months however finally found most of them useless except motorcar Title Swap Code. This Code will assist you bit to induce some higher rank over SERP. thus I set to develop my very own script for obtaining free to the present downside. when disbursement few weeks finally I developed my very own motorcar SEO Script for blogspot users. which might assist you to induce senior status over SERPs. The Script terribly|is extremely|is incredibly} straightforward and additionally very straightforward to put in. No any skilled data needed.

The Auto SEO Script has following features:-
  • Auto change Blog Page Titles for every post.
  • Auto insert Meta Description for every post.
  • Auto insert Meta Keywords For every Post.
  • Work for Monthly, Weekly and Daily Archives.
  • Work for each blog label.
  • Auto Meta Robot Tag
  • Author Meta Tag.
You only have to insert a Simple Code to your blog template.
Follow Steps below to apply this script:-
Go to Blogspot account.
  1. Select to Layout Button of your desired blog.(at Dashboard)
  2. Now go to Edit HTML Section.
  3. In Template Box, find the code below. ( This may be little bit different if you are using Title Swap code)
  4. <title><data:blog.pageTitle/></title>
  5.   Change above code with the code showing below (Select code and press Ctrl + C buttons to copy code)
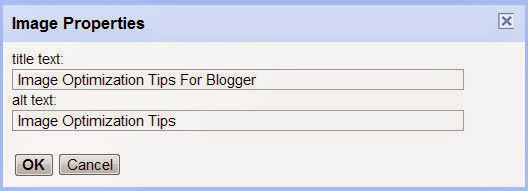
  6. <b:if cond='data:blog.pageType == "item"'>
    <title><data:blog.pageName/> | <data:blog.title/></title>
    <b:else/><title><data:blog.pageTitle/></title>
    </b:if>
    <b:if cond='data:blog.pageType == "archive"'>
    <title><data:blog.pageName/> | <data:blog.title/></title>
    </b:if>
    <b:if cond='data:blog.pageType == "label"'>
    <title><data:blog.pageName/> | <data:blog.title/></title>
    </b:if>
    <meta expr:content='data:blog.pageTitle + &quot; - Discription Here &quot;' name='description'/>
    <meta expr:content='data:blog.pageName + &quot;, Keywords Here &quot;' name='keywords'/>
    <meta content='Author Name Here' name='author'/>
    <meta content='index,follow' name='robots'/>
    now change description, keywords, and author name as you like. See image below, change only code in red boxes.

  7.  Description: Write description for your diary of regarding two hundred characters as well as areas.
  8. Keywords: Write five Keywords for your diary. do not repeat any word.
  9.  Author Name: modification diary Author name to your name.

You have done all the items currently save your templet and Check meta Details of your diary. you'll use SEO Centro for this. it'll take up to fifteen days to envision updated meta information on Google moreover as alternative search engines. The motorcar SEO Script can assist you diary to develop and obtaining higher ranking on all Search Engines. For any facilitate or quarry you'll leave a comment. i'll feel happy to unravel your issue.
  1.  


How to Add Title and Alt Attribute To Optimize Images For SEO Tips and Tricks

How to Add Title and Alt Attribute To Optimize Images For SEO Tips and Tricks

 
In my previous post I was discussed some image optimization techniques that help to increase blog traffic. Today I bring another helpful tutorial for blogger.com users. In this tutorial I will tell you how to add title and alt attribute for images while using them into blog posts. I am not going to tell you the benefits of using these two tags because I have covered this topic in my previous post. If you want to know in detail then read this "6 Tips To Optimize Images For SEO To Increase Blog Traffic". You will surely find this tutorial very interesting because these are the must use SEO techniques if you want to increase your blog traffic. So let play the tutorial.

Image Optimization For SEO in Blogger

  1. Go to blogger dashboard.
  2. Write new post.
  3. Upload an image by clicking the image icon from the top menu bar as shown below.
  4.  


Now to add title and alt (description) attribute to your image left click on the image and choose properties.
 
Once you click on the properties link, a pop up box will appear. Enter title and alt tag there as shown in below screenshot.
 

  1. Now click Ok and you are done!
Use this feature very wisely. This will surely help your blog to rank well in search engines. Don't use too many keywords in these tags. Only use one keyword that describes your blog post very well.


How Submit Blogger Sitemap To Bing and Yahoo Search Engines Blogger Tips

How Submit Blogger Sitemap To Bing and Yahoo Search Engines Blogger Tips

How to submit blog sitemap in Bing. They told me that their blog posts are not getting index in Bing and Yahoo. That's why today I bring this tutorial for all of you so that you can learn a best way to get all of your blog posts indexed in these search engines. Being indexed in all search engines increase our organic traffic that is must for success of our blog. Before I told you how to get blog posts indexed, let's first learn how to submit blog sitemap in Bing.

How To Submit Blog Sitemap To Bing and Yahoo?

There is no need to submit the blog sitemap in Yahoo. Submitting blog in BING will do the full job. Now let's start the tutorial.

  1. Go to Bing Webmaster Tools and log in with your Hotmail Account.

  2. Add your blog URL and click on Add button at the top of the page.
  3.  3 . Now copy the below code and paste into Add a Sitemap field on next page.
  4. Click on Add Button.
  5. Now you need to verify your blog ownership by adding Meta tag in your blog template.
  6.  


  1. Copy the meta tag and perform below steps:

    • Go to Blogger > Template
    • Find <head> and paste meta tag just below it
    • Save the template
    • You are done!
  2. Now go back to your Bing Webmaster Tools page and click on Verify button.

  3. If you have more than 500 published posts in your blog, then you must need to add more sitemaps. Go to your site dashboard in Bing Webmaster Tools and submit below sitemaps there.

  4. For Posts between 501 - 1000
    http://www.latestwebsitetools.blogspot.com/atom.xml?redirect=false&start-index=1&max-results=500

    For Posts between 1001 - 1500

    http://www.latestwebsitetools.blogspot.com/atom.xml?redirect=false&start-index=1001&max-results=500
Now you have successfully added your blog sitemap. It can take few days, usually 3 days, to get index your blog posts.

Now your blog is ready to gain organic traffic from Bing and Yahoo. Congrats :)
  • Check: Verify Site in Webmaster Tools Using Google Tag Manager
Now let see what we have to do to improve our blog's indexing rate in Bing and Yahoo.

How to increase Indexing in Bing and Yahoo Search Engines?

It usually happens that after submitting sitemap, our blog posts not get index on time in these two search engines. In that case we need to ping the Bing and Yahoo to notify them about our newly added content so that our posts get indexed as soon as possible. Let see how to do it.

Perform below steps:

  1. From the below Links, replace http://www.latestwebsitetools.blogspot.com with your blog URL.

  2. Now copy below links one by one and paste into your browser address bar and pres enter.

  3. You'll get a message "Thanks for submitting your sitemap" that means you have successfully pinged Bing. Cheers!


  4. LINK#1 For Posts between 1-500

    http://www.bing.com/webmaster/ping.aspx?siteMap=http%3A%2F%2Fwww.latestwebsitetools.blogspot.com%2Fatom.xml%3Fredirect%3Dfalse%26start-index%3D1%26max-results%3D500

    LINK#2 For Posts between 5001-1000

    http://www.bing.com/webmaster/ping.aspx?siteMap=http%3A%2F%2Fwww.latestwebsitetools.blogspot.com%2Fatom.xml%3Fredirect%3Dfalse%26start-index%3D501%26max-results%3D500


    LINK#3 For Posts between 1001-1500

    http://www.bing.com/webmaster/ping.aspx?siteMap=http%3A%2F%2Fwww.latestwebsitetools.blogspot.com%2Fatom.xml%3Fredirect%3Dfalse%26start-index%3D1001%26max-results%3D500

This is enough to start indexing of your blog posts in both the search engines. But I have noticed that our blog posts not get indexed on time and even not indexed many times.

That's the reason why bloggers fail to gain traffic from Bing and Yahoo search engines. To overcome this problem, we have a great feature in our Webmaster Tools account. When we publish a new post in our blog, we can submit the URL of that post to in our account. Adding link manually gives us 100% result of indexing the posts on time. Let see how to submit the links.


How To Submit Links in Bing Webmaster Tools?


Perform below steps:

  1. Go to My sites page in your Bing Webmaster Tools account.

  2. Choose your site.

  3. Click on Configure My Site and choose Submit URLs.

  4. Now add your blog post URL in the Submit URLs box and press Submit button.

  5. Note: We can only submit 10 links in a single day and 50 links in a month.
  6. That's it!

Summary

  • Submit your blog sitemap to Google, Bing and Yahoo search engines to gain organic traffic to your blog.
  • Track your number of indexed posts, traffic sources and linked sites from webmaster tools.
  • Ping Bing and Yahoo to improve indexing rate.
  • Submit links manually for assured results.


Drive Targeted Traffic from top 3 Sources only

Drive Targeted Traffic from top 3 Sources only

 
To day i am share a little 3 tricks how to increase targeted traffic. The top three sources are article marketing, blog commenting and forums. You need to become highly active in doing all three.

During your initial months of blogging, do not use any other way to promote your blog. Just focus on previous threes sources I told you before. When done with a focus, the result will make you happy.


Sign up for a free account in top article directory. The best place is to register as a member to hubpages.com

They have certain rules but if you follow to rules and you always produces good article, you can get more traffic when people click on your profile in the resource box.

Become the first reader to give comment in any new posts in the blogs you loyally followed. You will get more traffic to your blog when many readers click on your name in the comments box. It will add number of incoming links to your blog too, thus helps your blog to build good page rank at the same time.


Install Flash Player on Android Device without Google Play Store

Install Flash Player on Android Device without Google Play Store

 
You may have noticed that Google removed all Flash installation apps from Play Store last year. Google took this action due to the various complaints about the plugin and it’s vulnerability. So if you want to use any app that run only with Flash support than you have to find a way to install it. Today I will tell you how to Install Flash Player on Android Device without using Google Play store. This is a little bit tricky but a very easy and simple way. Here you need to install an app first and manually download the Flash installer from the Official Adobe website

Install APK Installer App

As I mention above you have to install an app in order to manually install Flash on your android device. Simply Tap on Play store icon and in the search bar write “apk installer” and you will see bunch of results. Now here you have to install the app from POTENTE Mobile Apps company with cord broad box icon. Download the app, Install it and it will optimize few settings on your device.
 

Download Flash Player Manually on Computer

Now first you have to download the Flash player latest version from Adobe Archive page on to your computer. Here you will see previous versions as well so you have to first identify your Android operating system version and download the appropriate version of Flash installer from this page.
 
Plugin your device to your computer and copy the installer package and paste it into your device local or SD card storage.
 
Go back to your device and run the APK App. Browse the file you just copy and install it. There you go you have successfully install the latest version of Flash player on your Android device.


Connect your Android Smartphone to your Ordinary LED TV

Connect your Android Smartphone to your Ordinary LED TV

 
Many people asked me this question how to connect Android Smartphone to your ordinary LED TV so that we can enjoy apps on big screen. Well I already wrote an article on how to convert your simple LED TV into SmartTV but if you don’t want to spent $35 dollars than here is a simple solution for you. But before moving towards that I wanted to tell you that this method only works with TV with HDMI port so if you have a very old LCD TV which has only component ports than either you need to buy HDMI to component converter or buy a new TV.

Buy mini USB to HDMI Cable

The solution is very simple all you need to do is to buy a mini USB to HDMI Cable which is available in the market for only $6 which is really cheap compare to other options. You can buy it from variety of online shopping websites and in Pakistan you can buy it from mbcommunication.com.pk website in only Rs,750/- only. After buying the product all you need to do is to attach the cable with your Android Smartphone and HDML LED TV. Turn on both devices and you will see everything which is available on smartphone on your big screen. Enjoy playing games and use apps with different style.


How to Use Microsoft Office on iPad and Android Tablets

How to Use Microsoft Office on iPad and Android Tablets

 
Microsoft Office is the best suite for creating and editing word documents as well as presentations. It’s the must software for your desktop computer or laptop and without it your computer is like an empty box. But as we all know that with the invention of smartphones and tablets people are moving towards these gadgets very quickly and they spend more time using these gadgets rather than full fledged computer. So it was the need of time that Microsoft introduced an app for Tablets so that we can easily create modify and read documents on these little machines.

Microsoft Office App for Apple iPad

Microsoft recently introduced a much awaiting App of it’s Office suite for Apple iPad users which is a great news. All you need to do is to visit the App store from your iPad or simply visit the features Apps section and you will definitely see this App on the top of the list. Install it instantly because it’s free but keep in mind that if you want to download all Apps like Word, PowerPoint, Excel, OneNote etc than you need at least 1GB storage space on your iPad.
 
One thing you should keep in mind too that these are just viewing Apps which means you cannot create or edit documents(unless you buy premium office 365 subscription). But never the less still you can take advantage of these Apps and increase your productivity more efficiently.

Download Microsoft Office App for Android Tablets


Transfer Files from Computer to Smartphone via Wi-Fi

Transfer Files from Computer to Smartphone via Wi-Fi


How many times you need to transfer data from one computer to another or from computer to smartphone and ending up with no solution. Well Windows allows you to transfer data between computers via WordGroup or peer to peer connection. But the problem is that it requires the same operating system and wires which means you have to setup a complex setup otherwise you will waste your time. Also Windows don’t allow you to send data to your smartphone which is really surprising in this modern era.

Install AnySend

AnySend is an amazing software available not only for Windows but also for Mac, Andriod and IOS platform which makes it really powerful application. The only thing you need to do is to visit the AnySend official website and download the free app on all the computers and devices where you want to transfer data.
After software installation run the program from Windows main menu and it will constantly run in your system memory. When ever you need to transfer file just copy that file or folder and select the computer or device from the AnySend menu by clicking on it’s icon in the system tray. It will instantly start the transfer process and you can enjoy your work while it will do it’s work.

Download AnySend app for Mac

Download AnySend app for Android


Effective Ways to write an impressive and perfect in the Blog

Effective Ways to write an impressive and perfect in the Blog


As things get more and more advance here, blogging is growing and increasingly difficult day. In the past, it was too easy to write articles or blog posts to go viral, it will rank higher in search results, and you'll get a lot of traffic packets, but today the whole scenario has changed. Today, while writing articles or blog posts, you need to take care of various points or points to classify this post and get traffic from it.
Write an impressive entrance perfect blog has never been difficult. Just take care of some important points to write and see your hand written blog goes viral among the people as soon as possible.

Enough talk Friends, let's move on to the actual material. Yes, actionable advice and tried to write impressive and perfect blog post.
1 Your audience is all you need
Your audience is all you need, and neither you nor your blog has no meaning without public (traffic). Try to understand your audience, if you do not know what he wants from you? Why visit your blog? What do they expect from you? You may not be able to write great content for your blog, because if you do not understand your audience, you can not write the content they need and everything you write will be nothing but a pile of garbage.

2 Steals the topic and the accumulation of knowledge
That's where most beginners fail. Raised the topic to write about a very important part in writing the perfect blog. Well, you have to choose the topic of trends in your niche for your perfect blog. You can use a variety of tools like Google Keyword Planner and Google Trends, to identify trends and hot topics in your niche.

After finding the topic of trends, now is the time to do some research on it to get knowledge about it. Use the search engine Google and read articles and other blog entries on the subject, specifically to gather information, what information was lost in his articles.

3 Steals catchy title
After picking the theme of trends, now you have to write attractive and catchy title for him. Latest news always play a vital role in SEO, you should include keywords in it. Use your mind and writing a catchy title for your blog.

It's almost a headline that attracts visitors because they believe that content later, after the title.

4- Using keywords
Write the perfect item without the basic knowledge of the density of keywords or fair keyword stuffing very difficult these days.

According to Google, you have to put your main keyword in the first and last 50 words of your blog. Do this because Google is the boss;).

I recommend that the density of keywords (keyword usage per message) should not exceed more than 1%.

5 Meta Description plays an important role
Stunned? How? Friend, meta description is one of the most important parts to be careful if you want to write the perfect blog entry. While writing the meta description, note should be descriptive (as the name suggests). Use your main keyword in the meta description and make it attractive.

6 Solid optimization
As meta descriptions, constantly plays the role of viral to help highlight above search results, get a good organic traffic and therefore make your blog is just perfect and amazing.

Permalink actually the URL of your blog. Be WordPress or Blogger, to write a blog post how to generate automatic linking, which is not optimized for SEO. Edit this link, put the name and main keywords in this permanent link and save.

I highly recommend you optimize your permalinks, because sometimes WordPress or Blogger Permalinks use numbers very annoying Google, and nobody can afford to annoy Google. I bet you can not!

7-optimizing images
Image Optimization is also very important because a lot of people to explore through Google Image Search and if your images are optimized, you have a great chance of getting this traffic too.

8 Conclusion!
After giving the final touch to your blog post. This is the time for completion. Ask your readers while they liked my post or not, because the feedback from readers is always welcome.

Ask them not to hesitate if you have something better to share what they seem, and may also request that create and share your post (secret weapon to increase traffic);).

Final words!
That's it! If you follow these tips, just none can stay his wonderful blog writing and becomes a great content writer and blogger. They have to share their experiences in this blog and tell me the results after applying the above tips in the comments below. We also sign up for premium items directly to your mailbox. See you soon!


Earn credibility and trust from visitors to our blog

Earn credibility and trust from visitors to our blog

 
Earn credibility and trust from visitors to our blog, is crucial when we started to build an audience who follow us.

Some small details and do not take into account, can cause us to lose potential readers. As we do not want that to happen, we must be very careful when writing blog posts.

Let's see what those details that build trust and credibility among our readers, focusing on the content we share are.

1. Be clear on the idea that we expose. In drafting our tickets, we must strive to be clear on the issue we are discussing, and to achieve this, largely, one must know and understand the subject we are dealing with. To do this, you need to tell your best.

Well informed about a topic, and understand at all, do we approach it with more clarity and certainty, same as we will show our readers. Do not forget that everything new that can contribute, add value to your publication.

Investigate important updates that you must take into account, although always choose reliable sources of information.

2. Be objective. When we wrote an entry, sometimes it's hard not involve feelings, ideologies or personal interests. Avoid if possible intermixing reviews and the fact news.

While people we love advice and / or recommendations lean too for or against something, not to mention all aspects that allow a more complete assessment, you can make the item loses credibility.

If we refer one debatable fact, it is important to sustain reasonable and verifiable arguments, the information you expose.

3. Cite the source. Whenever we use third-party content, because it has allowed us, it is important to cite the source with a link. Thus a reader can find out the source of our news or publication. This will generate confidence in the reader, and if he sees the same content elsewhere, we will of course only "share / disseminate" such content.

4. Add references and more information about a topic. Although it seems that is the same as mention the source, it is not at all. The source is the place where we got the information we are sharing and applies more to news entries kind, though not limited to these. Furthermore, the references are all those sources from which may have derived our entry, or that complement the information we are giving.

We may use references to give the reader more information on the subject of entry, and / or strengthen the content thereof. This also will make a reader can delve into a subject that interest you and provide that information can be verified, among other things.

5. Caring spelling. Sure we are all going out there, an occasional gaffe in spelling. Ideally we had a professional editor to verify the contents but not possible, we must strive to spell words correctly.

If you use the Blogger editor, you can auxiliarte tool that checks spelling, and although not identify any words for them to be rectified, yes it is a big help.

6. Add the date of publication. Some time ago, + My friend who has written several blogs, commented that when he reads a post or input is always fixed at the date of publication, thereby realizes if the input is present or not. He also said that not having it no longer return to the site. Which as readers do that, make much sense, since it is understood that we are in constant change in all areas, and many issues can be affected by updates.

By putting the date, a reader will have a clearer idea of whether or not a publication that can be trusted or may be outdated. There are issues on which we are compelled to do so, especially those in which technology is involved. So habituates date entries;)

7. Be respectful. This refers to how we handle information of third parties and we refer to our publication to review it. Always do it with respect and consideration.

Also, be careful terms or words used in our publications. Recall that the information is available to anyone on the network.

+1 Relax, be yourself. Enjoy the process of creating the entry !. While we must be careful in drawing, do not give too much thought to the matter seeking perfection, since it does not exist. Use common sense and go to the hearing as you would like to head for you.

Conclusions.
All these aspects speak for themselves on us and create our image in the blog readers. Win or no credibility and trust, depend on our performance in the blog.


3 Things that are not a Blogroll

3 Things that are not a Blogroll

According to Wikipedia, a blogroll is a collection of links Blogs shown on a website or blog. Now the sense that each can give to the term and the reasons that "you move" to take action to create your Blogroll, can be caused by many things ... I wondered for days was a blogroll, today we I will say that is not for me a blogroll:

 
3 Things that are not a Blogroll


1. A blogroll is NOT a link exchange are links to other sites that you put willingly.

2. A blogroll is NOT a simple list of links, are links to sites you like, you're, you read, you will, that may or may not show your same subject, and of course want to share with others.

3. A blogroll NOT a way to gain links is a way to show your affection, respect and / or admiration for other sites, without expecting anything in return.

For you, what is a Blogroll or should not be?


Questions and Answers on Google Affiliate Ads for Blogger

Questions and Answers on Google Affiliate Ads for Blogger

 Recently, Blogger announced a new way to make money with your blog. It is a new affiliate program, with which you can advertise directly on the posts. This program allows you to have more control over the ads you post, and you can choose between different ads available and could have an affinity to what you write on a post, adding product announcements that have used such and you like, that thus, you may feel that you are really recommending this product to your audience.

 
What is Google Affiliate Ads for Blogger?
Is a Google affiliate program that allows users to Blogger and Adsense, add product announcements to your site from posts, and earn commissions.

Who is eligible for the program Google Affiliate Ads for Blogger?
Currently, Google Affiliate Ads is available only for blogs in the United States, who have a valid AdSense account, and that the theme of the blog coincides with the categories of ads available.

How the commission generated?
You will earn a commission when a visitor to your blog clicks on an ad affiliate and makes a purchase.


How did they get paid?
The earnings of affiliate ads Google's get through your AdSense account. No need AdSense ads to make money with affiliate ads Google.


Getting Started With Affiliate program Google Ads for Blogger


If you already have an AdSense account

1. Write a new post from the editing pane Ticket
2. If your blog coincides with the categories of ads available, the gadget advertising products will appear in the configuration panel post and say "advertise products."
3. Select an ad affiliate from "advertise products," making first search with a category that could be related to what you write on a post. If you publish only an image with the link, select the image size from the drop down menu that says "Image". If you post the full announcement, select the size.
4. Publish your post, hence the announcement of the product you have chosen will appear.


If you do not have an AdSense account

1. Sign in AdSense
2. Once you've been approved for AdSense gadget "Promote Products" section configuration panel editing entries will appear. Write a new post from the panel.
3. If your blog will match the categories of ads available, the gadget advertising product called "Promote Products" section appears in the input configuration.
4. Select a gadget affiliate ad that says "Advertise Products". If you will publish it just an image with the link, select the image size from the drop down menu that says "Image". If you you will publish the full announcement, select the size.
5. Publish your post in this product announcement you've chosen will appear.